
How to Machine a Pallet for CNC
A pallet turns one machine table into many repeatable setups. This guide is for engineers and setup machinists who need to machine a pallet for CNC workholding that holds flatness, survives clamping, and drops onto a receiver the same way every time. Read it and you can judge material, thickness, hole pattern, and the limits of your own machining process.
In this article
- 1
- 2
- 3
- 4
- 5
- 6
- 7
- 8
Key takeaways
What a pallet actually does for the machine
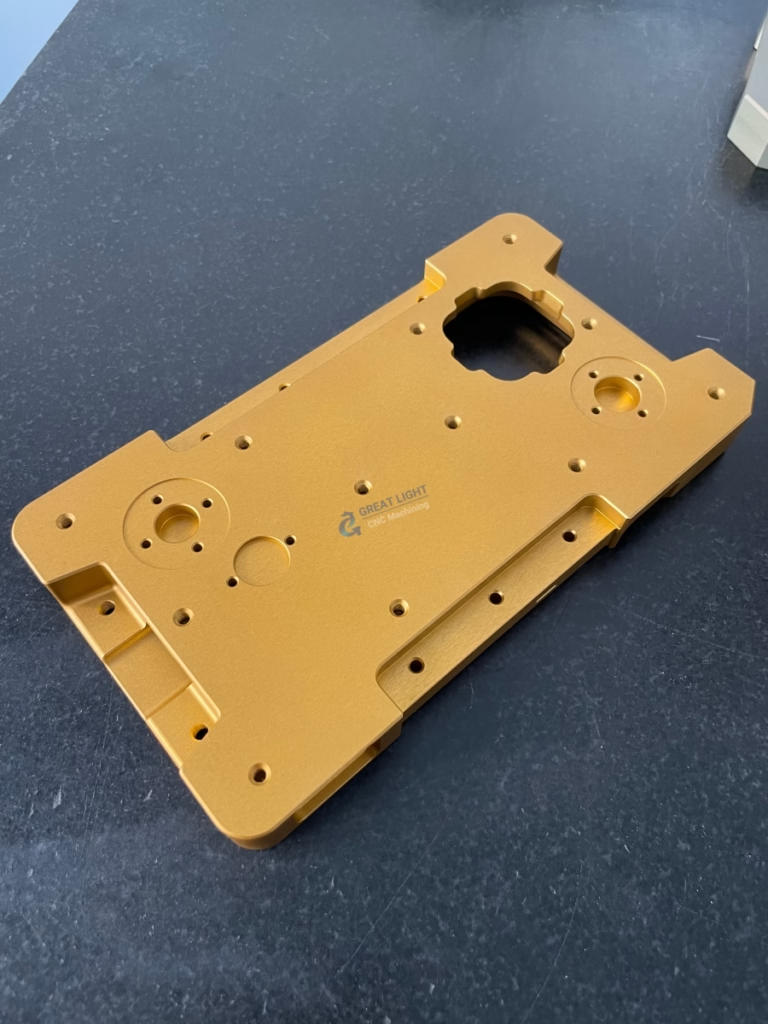
A pallet is the interface between the machine table and the workpiece. It gets bolted, clamped, and sometimes crashed into, so it takes the wear that would otherwise land on a machine table worth far more. That is the first reason to machine a pallet for CNC rather than clamping parts directly to the table.
The second reason is time. When you machine a pallet for CNC workholding, you build a repeatable location. Load a part off the machine, run another job, then put the pallet back on the receiver. If the pallet and receiver are matched, the part returns to the same position. No dialing in. No edge finder. No re-zeroing the work offset.
The third reason is access. A pallet can raise the part, rotate it, or present a face that the spindle could not reach on the bare table. Five-axis work often needs this. A pallet with a riser or angle block gives clearance for the tool holder.
- 1Wear goes to the palletClamping marks and crash dents stay on a replaceable plate, not the machine table.
- 2Position repeatsA matched pallet and receiver remove the setup step from the cycle.
- 3Tool access improvesRisers, angle plates, and tombstone shapes present faces the table cannot.
- 4Batch size changesOne pallet can carry one part or fifty. The interface stays the same.
Choose material and thickness before you cut metal
Most pallets are made from aluminum or steel. Cast aluminum plate such as 6061 or 7075 in the T651 condition is the common choice for small and medium pallets. It is light, cuts fast, and holds flatness well because casting leaves low residual stress. Rolled plate is cheaper, but it can move after you face it. If you use rolled plate, rough it, let it sit, then finish it.
Steel pallets make sense when the pallet sees heavy clamping, high cutting forces, or repeated thermal cycling. 4140 or 1045 pre-hardened steel holds threads better than aluminum. The trade-off is weight. A steel pallet that is too heavy to lift safely is a setup hazard, so keep it under the lifting limit of your crane or robot.
Thickness follows stiffness, not habit. A pallet that is too thin will deflect under clamping and the part will move. A pallet that is too thick wastes Z travel and adds weight. A practical rule is to make the pallet at least 4 to 6 times thicker than the tallest workpiece feature it supports, and never thinner than 20 mm for aluminum or 15 mm for steel.
- 1Cast plateLow stress, stays flat, good for pallets up to about 500 mm square.
- 2Rolled plateCheaper but needs stress relief and a second face pass.
- 3Pre-hardened steelBetter threads and wear resistance for heavy clamping.
Design the grid, edges, and locating features
A pallet grid is a pattern of threaded and reamed holes. A common layout is M12 threaded holes on 50 mm centers with four Ø16 mm reamed holes for dowel pins. The threaded holes hold clamps and fixtures. The reamed holes locate the fixture plate or the sub-plate. Keep the grid symmetric so a fixture can be rotated 180 degrees without re-machining the pallet.
The outer edge of the pallet should have a chamfer or a clear step. Sharp edges catch chips and gloves. A 1 mm × 45° chamfer on all top edges is enough. If the pallet sits in a receiver with a lip, leave a relieved band around the perimeter so chips do not hold the pallet off its seat.
Locating features are what make the pallet repeatable. Two dowel pins and a flat seat give you position and orientation. A single pin plus a flat seat only gives position. If you need angular repeatability, use two pins spaced as far apart as the pallet allows. The further apart the pins, the smaller the angular error for the same pin clearance.
- 1Threaded gridM12 on 50 mm centers is a common starting point.
- 2Reamed locating holesØ16 mm H7 for dowel pins, at least two per pallet.
- 3Chamfer the edges1 mm × 45° on top edges to avoid chip traps and burrs.
- 4Relief bandA shallow groove near the perimeter keeps chips off the seating face.
What goes wrong and how to avoid it
The most common mistake is machining only one face. A pallet that is faced on top but left as-rolled on the bottom will not sit flat. The bottom face is the seating face. It needs the same care as the top. Face both sides, and finish the bottom first.
The second mistake is drilling the grid before the faces are flat. Holes drilled into a stressed plate will move when the plate relaxes. Rough, semi-finish, check flatness, then drill. If you drill first, you may find the hole positions have shifted by the time you finish the faces.
The third mistake is using a fixture plate as a pallet. A fixture plate holds one part. A pallet holds the fixture plate. If you skip the intermediate plate, you lose the ability to swap jobs without re-machining the pallet. Keep the pallet generic and put the part-specific features on a sub-plate.
- 1Only facing one sideThe bottom face seats on the receiver. It must be flat and smooth.
- 2Drilling before stress reliefHole positions move when the plate relaxes. Rough and check first.
- 3Skipping the sub-plateKeep the pallet generic. Put part-specific features on a replaceable plate.
- 4Ignoring chip controlChips under the pallet cause rock. Add a relief band and clean the seat every load.
How to check the pallet before it goes into production
Check flatness first. Put the pallet on a surface plate or a granite table and sweep the seating face with a 0.01 mm indicator. Hold 0.02 mm over 300 mm for general work. For high-precision work, aim for 0.01 mm over 300 mm. If it is worse than that, the pallet will rock and your repeatability is gone.
Check hole position next. Use a coordinate measuring machine or a dial indicator on a gauge pin. The reamed locating holes should be within 0.02 mm of their nominal position. Threaded holes can be looser, but they must be perpendicular to the seating face. A tilted thread pulls the clamp sideways.
Finally, run a repeatability test. Load the pallet onto the receiver, indicate a known feature, remove the pallet, and load it again. Do this five times. The variation should be under 0.01 mm for a good pallet and receiver pair. If it is larger, check for chips, burrs, or a worn receiver before you blame the pallet.
- 1Flatness0.02 mm over 300 mm for general work, 0.01 mm for precision.
- 2Hole positionReamed holes within 0.02 mm of nominal.
- 3RepeatabilityFive load cycles, variation under 0.01 mm.
How to machine a pallet for CNC: 8 steps
- 1Measure the receiver and record the interfaceWrite down the pull stud type, taper size, zero-point chuck diameter, and bolt pattern. Check the receiver for wear with a dial indicator. If the receiver runout is over 0.01 mm, fix that first. A perfect pallet on a worn receiver will still repeat poorly.
- 2Cut the blank oversizeLeave 2 to 3 mm on all faces and edges for cleanup. Mark the top face with a scribe line or a paint dot so you can keep the same face up through every operation. If the plate is rolled, stress relieve it before roughing.
- 3Rough the top and bottom facesFace both sides with a 63 mm or 80 mm face mill. Take 0.5 mm per pass at 800 to 1,200 m/min surface speed for aluminum. Flip the plate and face the other side to the same stock allowance. The goal is equal material removal from both faces so stress releases evenly.
- 4Semi-finish and check flatnessTake a 0.2 mm pass on both faces. Then set the plate on a surface plate and check flatness with a 0.01 mm indicator. If it rocks, flip it and take another 0.1 mm pass. Do not chase flatness with a finish pass on a plate that is still stressed.
- 5Finish the seating faceThe face that contacts the receiver is the critical one. Finish it with a 0.05 mm pass at high spindle speed and low feed. Aim for Ra 0.8 to 1.6 μm. A smoother face seats better and resists chip embedding. Mark this face with a stamped arrow so it always goes down.
- 6Drill and tap the gridSpot drill every hole to 0.1 mm depth, then drill with a stub drill. Tap M12 with a spiral flute tap at 300 to 500 rpm. Use a tapping fluid, not just coolant. Blow out each hole and check thread depth with a go gauge. A shallow thread will strip under clamp load.
- 7Ream the locating holesDrill 15.8 mm, then ream to Ø16 mm H7. Ream at 100 to 200 rpm with a slow, steady feed. Do not stop the spindle in the hole. Check the pin fit by hand. A dowel pin should slide in with light thumb pressure and show no rock.
- 8Chamfer, clean, and inspectChamfer all top edges 1 mm × 45°. Deburr every hole. Wash the pallet, dry it, and inspect flatness, hole position, and thread depth. Record the values on the pallet. A pallet without a record sheet is a pallet nobody trusts.
Pallet material and thickness by use case
Use this table to pick a starting point, then adjust for your machine and part.
| Use case | Material | Thickness | Why |
|---|---|---|---|
| Small parts, high mix | Cast 6061 aluminum | 20–25 mm | Light, fast to cut, easy to re-machine |
| Medium parts, 5-axis | Cast 7075 aluminum | 25–40 mm | Stiffer than 6061, holds tapped threads better |
| Heavy clamping, steel parts | 4140 pre-hardened steel | 20–30 mm | Threads survive repeated clamp cycles |
| Large pallet over 500 mm | Cast aluminum with ribs | 40–60 mm | Ribs add stiffness without full thickness |
| High thermal cycling | 4140 or 1045 steel | 25–35 mm | Lower thermal expansion than aluminum |
| Prototype or one-off | Rolled 6061 plate | 20–30 mm | Cheap, but expect a second face pass |
Frequently asked questions
Can I machine a pallet from rolled aluminum plate?
Yes, but expect it to move. Rolled plate carries residual stress from the rolling mill. When you face one side, the stress releases and the plate bends.
Rough both faces, leave 1 mm of stock, let the plate sit for a few hours, then semi-finish and finish. If the part tolerances are tight, use cast aluminum plate instead.
How many locating pins does a pallet need?
Two pins minimum for position and orientation. One pin only gives you position, not angle. If the pallet is large, use two pins spaced as far apart as possible.
A third pin can over-constrain the pallet if the holes are not perfectly aligned. Two pins plus a flat seat is the standard approach.
What flatness should I hold on the seating face?
For most CNC work, 0.02 mm over 300 mm is enough. For high-precision work or large pallets, aim for 0.01 mm over 300 mm.
The seating face matters more than the top face. If the bottom is not flat, the pallet rocks and every setup moves.
Should I harden a steel pallet?
Only if the pallet sees heavy wear or repeated clamping. Pre-hardened 4140 at 28 to 32 HRC is a good balance. It machines with carbide tooling and holds threads well.
Fully hardened pallets are hard to re-machine. If you need to add holes later, pre-hardened steel is easier to work with.
How do I keep chips out of the receiver interface?
Add a relief band around the perimeter of the seating face. This gives chips somewhere to go instead of sitting under the pallet.
Clean the receiver and the pallet seat with a brush and air before every load. A single chip can lift the pallet by 0.05 mm or more.
Can GreatLight machine pallets and fixture plates for my machine?
Yes. We machine pallets, sub-plates, and fixture plates on 3-axis, 4-axis, and 5-axis centers. Tolerances to ±0.005 mm and surface finishes from Ra 0.2 to 0.8 μm are available.
Send us your receiver dimensions and part drawings. We return a quotation and DFM analysis within 12 hours. No minimum order quantity, from one prototype to 10,000+ parts.
Need a pallet or fixture plate machined?
Upload your receiver dimensions and part drawings. We quote in 12 hours and machine to ±0.005 mm with 100% inspection before shipment.
12-hour quote100% inspectionNo minimum orderISO 9001:2015
GreatLight on social
We publish setup notes, tooling trials and inspection data from the factory floor.











