
Advanced CNC Machining Photos: Reading the Details
A finished part sitting on a bench looks impressive and proves very little on its own. The images on this page show setups, tool marks, thin walls and blended surfaces, and each caption explains what that detail means for tolerance, cost and lead time. Written for engineers and buyers who want to judge a shop from its actual work.
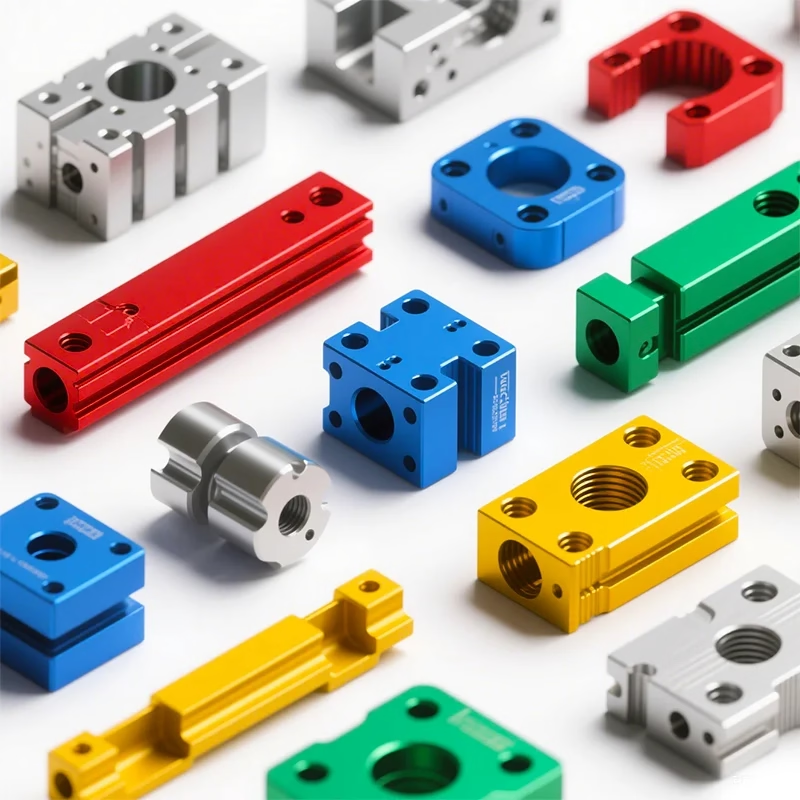
What to Look For in a Machining Photo
Setups, tool access, wall thickness and surface texture are the four things a good image actually proves.
The Setup Behind the Shot Matters More Than the Shine
The setup behind the shot matters more than the shine. A bracket photographed from one angle can hide a second operation, a re-clamp, or a hand blend that took twenty minutes. When we review advanced CNC machining photos, the first question is how many setups the part needed. One setup on a five-axis center means the datum never moved, so position between features stays tight.
Look at the clamping marks. Light witness marks on a non-critical face are normal. Deep jaw marks on a sealing face are a warning, because that surface will need rework or a softer clamping strategy. On thin-walled parts we often switch to vacuum fixturing or low-profile clamps to keep the wall from springing during the cut.
Machine travel sets a hard limit. Our largest five-axis travels reach 4,000 × 400 × 150 mm, and the medium frames cover 750 × 1,150 × 550 mm. If a part is longer than the table, the shop either repositions it, which adds error, or declines the job. A photo of the part on the table tells you which frame was used.
Tool Access and Undercuts in Five-Axis Work
Three-axis machines cut from above. Five-axis adds two rotary axes, usually A and C, so the tool can tilt into a pocket wall, a port, or an undercut. Our shop runs 16 simultaneous five-axis machining centers, plus 12 four-axis mills and 27 three-axis machines. The part decides which one is right.
A deep pocket with a 5° draft and a radiused floor is a five-axis job. The tool reaches the corner at an angle, so you get a continuous floor instead of a stair-step that needs EDM or hand finishing. A flat plate with through-holes is not. Putting that on a five-axis center burns spindle time for no gain.
Undercuts are the clearest tell. If a feature has no line of sight from any single tool direction, it needs either a rotary setup or a split design. In the photos, look for a blended transition around a curved rib or a boss on a sloped face. That blend usually means the tool was tilted and the toolpath was continuous.
The Ø400 mm rotary table handles most of the round work we see. Beyond that diameter, we plan the setup around the part axis rather than the table.
Reading Surface Finish and Tool Marks
Tool marks tell you the finish class. A uniform, overlapping scallop pattern from a ball nose cutter usually points to a fine finish in the Ra 0.2–0.8 μm range. A visible stepover with a matte look is closer to as-machined, Ra 1.6–3.2 μm. The middle band, Ra 0.8–1.6 μm, is what most functional sealing and sliding faces need.
Anodized parts hide the base texture, so judge the pre-finish surface instead. Hardcoat anodizing builds a layer that can round a sharp edge and slightly change a tight tolerance. We call that out before the finish step, not after.
A photo cannot measure Ra. It can show whether the shop cares about consistency across a face. Streaks, chatter marks, or a patchy blend are process signals, and they usually mean the cutting parameters or the tool holding were not dialed in.
Tolerance and Finish by Feature Type
Typical targets for common machined features.
| Feature | Typical tolerance | Finish target | Best machine |
|---|---|---|---|
| Mating bore, press fit | ±0.005 mm | Ra 0.8–1.6 μm | Five-axis |
| Sealing face, O-ring groove | ±0.005 mm | Ra 0.2–0.8 μm | Five-axis |
| Thin wall under 1 mm | ±0.005 mm | Ra 1.6–3.2 μm | Four-axis |
| Flat plate, through-holes | ±0.005 mm | Ra 1.6–3.2 μm | Three-axis |
| Curved rib, blended fillet | ±0.005 mm | Ra 0.8–1.6 μm | Five-axis |
| Turned shaft, Ø under 400 mm | ±0.005 mm | Ra 0.8–1.6 μm | Mill-turn |
Materials That Show Up Well in Photos, and Ones That Do Not
Aluminum 6061, 7075 and 6082 photograph cleanly because the chips clear and the surface stays bright. Stainless 304 and 316 tend to work-harden, so a photo of a stainless part with a mirror finish implies slow feeds, sharp tools and a lot of coolant. Titanium TC4 and Inconel are harder again, and a good surface on those parts is a stronger signal of process control than the same finish on aluminum.
Plastics are the opposite case. POM and PEEK cut well but hold burrs on edges, and a close-up will show them. Carbon fiber and magnesium AZ31B need different handling again. None of this is visible from a wide shot, which is why we photograph edges and pockets, not just the whole part.
Material choice drives the finishing route too. Anodizing suits the 6000 and 7000 aluminum grades. Electroless nickel and zinc plating work across steels. Laser marking needs a minimum character height of 1.5 mm to stay legible after coating.
Using Photos to Judge a Shop Before You Send a Drawing
A shop that posts close-ups of setups, fixtures and inspection benches is showing you its process. A gallery of only glossy hero shots is marketing. Both exist. The useful middle ground is a photo set that names the material, the machine, and the finish, because those three facts let you check the claim against the part.
Ask for the inspection report that matches the photo. We inspect 100% of parts before shipment, with a raw material check, in-process monitoring and a final inspection, and reports come on request. If the photo shows a tight feature but there is no report behind it, treat the tolerance as unverified.
For prototypes, one part is enough to start. We run from a single prototype up to 10,000+ part runs, with no minimum order quantity. Quotation and a free DFM analysis come back within 12 hours, and production can start within 24 hours.
Common Questions About Machining Photos
Do advanced CNC machining photos prove a tolerance?
No. A photo shows geometry, surface texture and setup choices, but it cannot measure a dimension.
The tolerance claim has to come from an inspection report tied to the same part number and lot.
Why do some parts look polished in the photo but arrive matte?
Lighting and coating change appearance. Anodizing, bead blasting and electroless nickel all shift how a surface reads.
Ask which finish step the photo was taken after, before or after coating.
Can you machine a part with no line of sight from any direction?
Sometimes. A rotary setup on a five-axis center reaches many undercuts that a three-axis machine cannot.
If the feature is still unreachable, we suggest a split design or a different process and say so during DFM.
What wall thickness is practical for five-axis work?
It depends on material and part size. Thin walls deflect under cutting force, so we adjust clamping and stepdown.
Send the drawing and we will flag any wall that needs a different strategy before quoting.
Are the parts in your photos custom or stock?
All machined parts shown are made to customer drawings, from one-off prototypes to production runs.
Drawings and uploads stay confidential, and an NDA is available on request.
Send a Drawing, Get a Quote and a DFM Note
Upload your files and get a quotation plus a free DFM analysis within 12 hours. Uploads stay secure and confidential.
12-hour quote100% inspectionNo minimum order quantity









