
CNC Machining Center Overview: A Brief Guide
A cnc machining center overview for engineers who need to judge a shop's real capability. This page explains how the machine removes metal, what it can and cannot hold, and which axis count fits your part geometry.
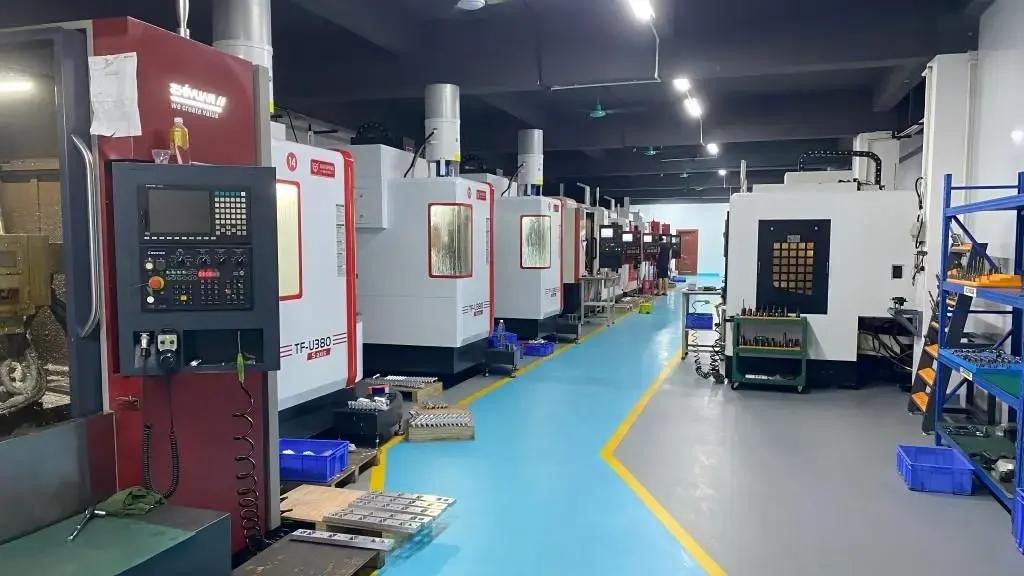
What a cnc machining center actually is
A cnc machining center is a milling machine that reads a program instead of a handwheel. The spindle holds a rotary cutter, the table or the spindle moves along linear axes, and a tool changer swaps cutters between operations. Once the setup is dialed in, the machine repeats the same path on every part in the batch.
The word center matters. A plain CNC mill has one spindle and a manual tool change. A machining center adds an automatic tool changer, often a pallet changer, and enough rigidity to take heavy interrupted cuts. That combination is what lets one machine drill, tap, bore, face and profile a part without an operator standing at the door.
Most shops describe a machine by its axes. A 3-axis center moves X, Y and Z. A 4-axis center adds rotation around one axis, usually a rotary table so the part can be indexed to four sides. A 5-axis center adds a second rotary axis, so the cutter can tilt and reach the part from almost any direction in one setup.
That last point is the real dividing line in quoting. Axis count changes how many setups a part needs, and setups are where tolerance stack-up and labor hours come from. A part that needs five sides machined is a different job on a 3-axis machine than on a simultaneous 5-axis one.
An overview of this machine type is really an overview of setup count. Cutter diameter, spindle taper, table size and travel limits set the floor. The program, the fixture and the tool list decide whether the part comes out at ±0.005 mm or drifts halfway through the run.
- 1SpindleHolds the rotary cutter; taper and rpm set the cut you can take.
- 2Axes3, 4 or 5. More axes means fewer setups, not automatically better parts.
- 3Tool changerSwaps cutters between operations without an operator.
- 4EnclosureContains chips and coolant; also keeps the thermal drift lower.
How the cutter removes metal
Every cut is a controlled fracture. The tool edge presses into the material until shear stress exceeds the workpiece strength, and a chip peels away along the shear plane. Heat splits between the chip, the tool and the part. On aluminum most heat leaves with the chip. On titanium and stainless, more of it stays in the tool and the part, which is why those jobs run slower.
Feed and speed are not guesses. Surface speed (m/min) sets the spindle rpm for a given cutter diameter. Chip load (mm per tooth) sets the feed rate. Multiply chip load by tooth count and rpm and you get table feed. Increase either one past what the tool and fixture can take and you get chatter, broken edges or a scrapped finish.
Climb milling is the default on a machining center. The cutter rotates into the material so the chip starts thick and thins out. That pushes the cutting force down onto the fixture instead of lifting the part, and it leaves a better surface. Conventional milling still has a place on rough castings with hard scale, where the edge would otherwise chip on entry.
Roughing and finishing are separate operations for a reason. Roughing removes bulk material with a large radial depth, leaving 0.2–0.5 mm of stock for the finish pass. The finish pass uses a smaller step-over and a sharper tool to hit the final dimension and surface finish. Skip the finishing allowance and the part will be undersized or out of round.
- 1Surface speedSets rpm from cutter diameter and material.
- 2Chip loadPer-tooth feed; too high breaks edges, too low rubs.
- 3Climb millingForce goes into the fixture, not the part.
- 4Finishing stockLeave 0.2–0.5 mm for the last pass.
What the machine holds and where it stops
Tolerance is a system number, not a machine number. A modern machining center can repeat to ±0.005 mm, but only if the fixture is rigid, the tool is sharp, the coolant reaches the cut and the shop controls temperature. A flexible setup or a long thin tool will move the result well past that band no matter what the spec sheet says.
Size is a hard limit. Travel on a large machine can reach 4,000 × 400 × 150 mm. Medium machines cover 750 × 1,150 × 550 mm and 600 × 600 × 600 mm. Compact machines run 500 × 500 × 450 mm and 500 × 310 × 200 mm. If your part does not fit inside the travel envelope with room for the fixture, the job goes to a different machine or gets split.
Aspect ratio decides more than size does. A pocket 6 mm wide and 60 mm deep needs a tool that is long and thin, and it will deflect. Depth-to-diameter above 4:1 on a standard end mill starts to need a reduced step-down, a stub or necked tool, or a different process. Deep bores, long slots and thin walls are the three shapes that most often force a redesign.
Surface finish follows from the same setup. A fine finish of Ra 0.2–0.8 μm needs a rigid tool, a light finish pass and often a dedicated finishing cutter. A high finish of Ra 0.8–1.6 μm is a normal machined result. As-machined surfaces land at Ra 1.6–3.2 μm. If the drawing calls for a mirror finish, the shop may need to add a polishing step after machining.
Material changes everything downstream. Aluminum 6061 and 7075 cut fast and hold tolerance well. Stainless 316L and 17-4PH work-harden, so the tool cannot dwell. Titanium TC4 and Inconel generate high cutting temperatures and wear tools quickly, which pushes cycle time up. Plastics like POM and PEEK cut easily but move with heat, so light passes and sharp tools matter more than spindle power.
- 1Rigid setup firstTolerance follows the fixture, not the brochure.
- 2Travel envelopePart plus fixture must fit, with clearance to spare.
- 3Depth-to-diameterAbove 4:1, expect deflection and a slower cut.
- 4MaterialHard alloys add time; plastics add thermal drift.
What a single setup can do
One machining center setup can run a long list of operations. Face milling squares the top. Spot drilling locates the hole. Peck drilling breaks chips in deep holes. Tapping cuts threads. Boring brings a hole to final size and roundness within ±0.005 mm. Reaming holds a tight hole tolerance with a better finish. End milling profiles the outside. A chamfer tool breaks the edges.
Thread milling deserves a mention because it solves a common problem. A tap is a fixed size, so a broken tap means a scrapped part or a slow removal job. A thread mill cuts the same thread with a single-point tool, so the operator can adjust the diameter by a few microns and back the tool out if chip load runs high. On expensive parts, that is worth the extra cycle time.
Probing turns a machine into a measuring device. A touch probe can find the stock position before the first cut, check a bore mid-cycle, and log the result. That lets the program shift its own origin when a casting varies, or stop the run when a dimension drifts. It is not a replacement for final inspection, but it catches problems while the part still has stock to remove.
Five-axis machines change the order of operations. The part can rotate under the cutter, so a hole on a 30° face does not need a separate fixture. That reduces the number of setups from four or five down to one or two, and each avoided setup removes a chance to lose position. The trade-off is programming time and a machine that is harder to keep loaded.
Mill-turn centers go one step further. A lathe-type spindle turns the part while a milling spindle cuts off-axis features. For a shaft with flats, cross holes and a turned diameter, one mill-turn cycle can replace two machines. The limit is bar size and the balance between turning and milling time; if milling dominates, a separate mill is still faster.
- 1Hole makingSpot, drill, bore, ream, tap or thread mill in one cycle.
- 2ProbingFinds stock position and checks bores mid-cycle.
- 3Five-axisCuts angled faces without a new fixture.
- 4Mill-turnTurning plus off-axis milling on one machine.
Which machine for which part
Use geometry and tolerance to pick the axis count, not habit.
| Part shape | Setup need | Typical choice | Watch out for |
|---|---|---|---|
| Flat plate, holes on one face | 1 setup | 3-axis vertical | Back side needs a second op |
| Box with four sides | 2 setups | 4-axis with rotary table | Indexing error between faces |
| Angled faces, deep pockets | 1-2 setups | 5-axis simultaneous | Programming time and cost |
| Long shaft with flats | 1 setup | Mill-turn center | Bar size limit, cycle balance |
| Thin wall, tight tolerance | 1 setup, soft jaws | 3-axis plus finishing pass | Deflection and chatter |
| Large weldment, 3 m long | 2 setups | Large-bed 3-axis | Travel and fixture stiffness |
The short version
Choose a 3-axis center when the part is flat, the tolerance is normal and cost matters. Move to 4-axis or 5-axis when the geometry needs several faces and you want to cut setup count. If the depth-to-diameter ratio is above 4:1 or the wall is thin, fix the design or the fixture before choosing a machine.
Common questions
Does a 5-axis machine hold tighter tolerance than a 3-axis one?
Not by itself. Axis count changes how many setups a part needs, and fewer setups remove stacking error. A well-fixtured 3-axis job can still hit ±0.005 mm.
The real gain from 5-axis is position accuracy across angled faces, because the part does not get moved and re-clamped between operations.
What depth-to-diameter ratio is safe for a milled pocket?
On a standard carbide end mill, 3:1 to 4:1 depth-to-diameter is comfortable. Past that, the tool deflects and the wall tapers.
For deeper pockets, use a reduced step-down, a necked or stub tool, or a smaller tool with a helical entry. Above 8:1, expect to rough with a long tool and finish with a short one.
Can a machining center cut hardened steel?
Yes, with the right tooling. Pre-hardened 4140 and 4340 at 30–40 HRC cut well with coated carbide and a rigid setup.
Above about 45 HRC, cutting forces and tool wear rise sharply. Many shops rough before heat treatment and finish after, or use EDM for the final detail.
Why does the same program give a different finish on different material?
Surface speed, chip load and heat partition all change with the material. Aluminum carries heat away in the chip, while titanium and stainless push it into the tool and the part.
That is why a program written for 6061 will chatter or burn a tool in 316L. Feed and speed need to be recalculated, not reused.
How do I know if my part fits the machine before I send it?
Check travel envelope, part plus fixture size, and the longest tool the feature needs. Those three numbers decide most fits.
If a feature is deeper than four times the tool diameter, or the wall is thinner than 1 mm, flag it in the RFQ so the shop can quote the real setup.
Is a machining center the right process for a thin-wall part?
Sometimes. Thin walls move under cutting force, so the shop needs light passes, sharp tools and often a support fixture or soft jaws.
For walls under 0.8 mm, check whether the design can add a rib or a thicker flange. If not, expect more passes and a higher price per part.
Send us your drawing
We review the geometry, flag the hard features and quote within 12 hours. No minimum order quantity, from one prototype to 10,000+ parts.
12-hour quote100% inspectionNDA on request
More machining notes
We publish setup notes, tooling trials and inspection data from the factory floor.











